First attempt
April 5
Louis@amaHalo


First attempt
This is our first attempt at fitting LED modules to a scale model before production begins, and we used hand-made engineer samples, which will be slightly different from the final LED modules.
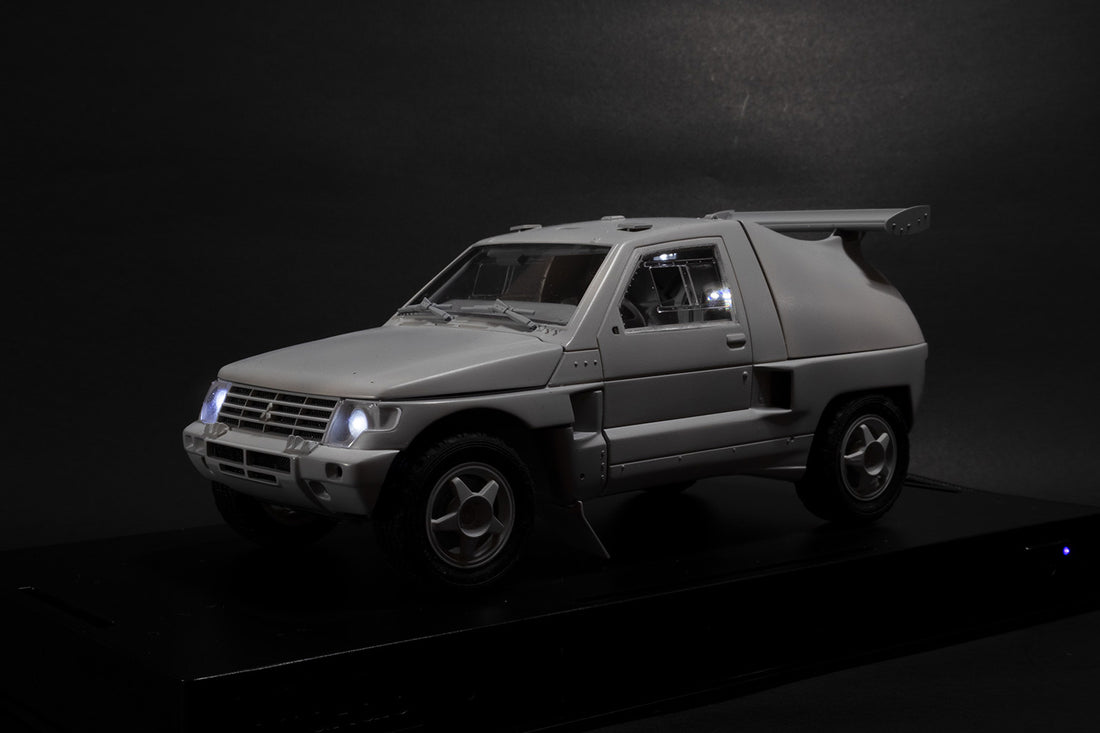
Scale model: 1/24 Mitsubishi Pajero 92 Paris-Le Cap Winner
LED module: LM-54W (white) x 3
: LM-54R (Red) x 2
: LM-54Y (yellow) x 2

01 Back panel light

Drill a 1.5mm hole at the lamp position on the back panel and place the LED module on the back side of the panel.

Insert a 1.5mm light guide (included in the package) to guide the light from the LED to the front of the panel. Compare the results with and without the light guide.

Secure the module body with super glue and arrange the excess wire in a spiral.

Cover the LEDs with black tape to prevent light leakage.

Just place it in your display case and you can check the results anytime.
02 Dashboard Light

Drill a hole in the dashboard.

Use a thin plastic sheet (0.3mm) to cover the back of the dashboard.

Install two yellow LED modules and align the LEDs with the holes in the dashboard. Make sure to leave some distance between the LEDs and the plastic sheet so that the light is evenly distributed. Also, try to place the module coil parallel to the display case coil for best efficiency. It's okay to place the module body upside down.

Again, you can test your results at any time by placing the dashboard in a display case.

Testing the dashboard after assembly.
03 Taillight

Drill a 1mm hole on each side of the tail light.

Create a pocket (approximately 1.5mm wide and 3mm long) with a stripe of plastic on the back of the tail light to hold the LED in the correct position and in the correct orientation.

Paint the pocket black to prevent light leakage. Then create a platform and clamp the module body onto it. This will keep the module coil parallel to the display case coil.

Insert a 1mm light guide (included in the package) into the drilled hole and test the result.

Test fit the clear cover and check the results.
04 Headlights

Drill a 1.5mm hole on each side of the headlight.

As with the taillights, create a pocket behind the headlight with a stripe of plastic.

Paint the pocket black to prevent light leakage. Since there is no space to store the module body at the front of the engine bay, I placed it at the back and built a platform to hold it upright.

Paint the headlights chrome to improve light reflection. Insert 1.5mm light guides to guide the light from the LEDs to the front.

Test the results.
05 Summary
It was a fun build because the Pajero is big enough to install more LED modules (7 in total) and try different mounting methods. Firstly, the light guide helps to guide the light from the back side of the plastic to the front side. On the other hand, the 1.5mm light guide is more efficient than the 1.0mm one. But the 1.0mm light guide is closer in scale to the actual bulb size. So, it's up to you to choose which one to use.
If space permits, making a pocket can help you mount the LEDs in the right position and at the right angle. It makes assembly easier. You can fix the module body first, organize the excess wires, and then insert the LEDs into the pocket at last. (Even after spray painting)

I hope this demo can be useful to you. There are no hard and fast rules for mounting LED modules. Creativity is always the key. Have fun modeling!


#amahalo #installLED #addlights
English How-to Guide available at https://www.amahalo.com/post/the-first-try-1-24-pajero
Translated by 205 Hobbies with permission from amaHalo.